If you are just tuning in check out the intro to this series here.
After we got the Dining Room pretty much squared away I got pregnant. YAY! But not yay because I was so so so sick. My client also had a brand new baby so needless to say we took a little break from the spaces. We were still waiting for the chairs to get in anyway. We spent the next month trying to get the chairs ordered. To be honest it was kind of a disaster. When we finally got them delivered a few were damaged so we had to go through the messy process of returning them and getting new ones. Oh why can't things just go the way we want them to all the time!!
After we got the new chairs in we needed to find a way to add some family photos to the space... but honestly I just didn't want to put anything on that wallpaper or her board and batten so we decided to incorporate the pictures in the adjacent Living Room somehow.
So on to the Living Room!
My initial thought was to bring over some of our leftover curtain fabric and use it as pillows in the space. I wanted these rooms to flow really well into each other. So we decided to use the same color scheme.
We definitely needed to paint the room. I had seen Palladian Blue used by Caitlin Creer in her Spring Lane home.
and I'd recently used it in my model home.
photo by Jylare Smith Photography
My client loved it so she had the entire Living Room painted. We also had some really tricky space planning to figure out. The room flowed into the Dining Room so we couldn't really put a huge sofa right in the middle of the room and there weren't a lot of flat walls to put furniture against so everything had to float.
The piano also seemed to pose a big problem. It was so bulky and there didn't really seem to be a good place to put it. But, this was their piano room so the piano had to stay!
I recommended the possibility of moving the piano into the bay window and then building shelves on the wall under the small windows. It would look similar to the shelves in this project that I did.
photo by Jessica Kettle Photography
Or the other option was to keep the piano where it was and do a window bench in the bay window like this:
She loved the window bench idea! We then talked about what type of window treatments to do. Because she has the beautiful plantation shutters we couldn't do inside-mount roman shades and because of the window bench we couldn't do full length panels. I suggested we do outside mount roman shades and actually make them much longer than her windows to give the illusion that her windows were taller. I liked these two options for roman shades:
She chose the Bleeker and I ordered the fabric and had it sent to Windows by Melissa for her to make them.
Because the room didn't really have focal point and was so open I liked the idea of doing a round rug. Here were some of the options I recommended.
She chose the Soho Rug which brought our room to look something like this:
The other obstacle was now this large blank wall:
We debated putting a bookshelf on that wall.
I thought something mostly open like the Bourdannais Bookcase would help balance out the bulkiness of the piano. But it still felt like too much so we then discussed adding some large art to the wall. She sent me these ideas of art she liked:
I liked all of these but none of them were big enough to fill the whole wall. I was flipping through House Beautiful and came across this image:
I loved the idea of putting floating shelves on the wall and layering different pieces of art. This also solved the challenge of displaying family pictures that we never got figured out in the Dining Room!
We decided to use these Pottery Barn shelves to get the look we wanted.
We also ordered some Pottery Barn frames for the shelves. The picture ledges were 3.5" deep or 4.5" deep. The main difference would be price and with the deeper ledges we would be able to layer the frames a little more. The longest they both went was 4' so I thought since the wall is pretty wide we could add two together and do two rows so we would need to buy 4 ledges total.
She wanted to put wedding pictures on the ledges of her parents and grandparents. I also thought we could add in some different art pieces. She sent me this picture that she loved:
and I recommended these two pieces:
via Michelle Armas
Next order of business was some sort of seating. Because the room needed a lot of flow space I thought two chairs would be best. We could float them kinda in the middle so people could still easily walk through both rooms. I really envisioned doing the chairs in red but ready-made red chairs in the exact color we needed were hard to find. So we talked about doing something custom and picking the fabric we wanted to use. I offered up these suggestions:
Carnival Ikat
She liked the chevron High Voltage print but she was a little worried it was a different feel than her traditional floral curtains we had going in the Dining Room. I love adding modern graphic prints to a semi-traditional room so I didn't worry about it. I sent her this picture for an example of how the fabric looked on chairs and she was sold!
image via Lily Bunn Interiors
I looked all over the classifieds but nothing had the scale and look we wanted. I knew that Ballard Designs lets you send in your own fabric and they'll cover almost any of their chairs in it. I liked these options:
Overall she liked the Leyland chair best.
Lastly we needed a floor lamp and some side tables to put by the chairs. These were options I sent for floor lamps.
She loved the Cooper lamp but she also liked the Serena lamp and since it was MUCH cheaper we went with that option. I'm always conscious of keeping rooms from getting out of control. For example we'd spent a lot of money on the chairs and the custom window treatments so it was good to go a little cheaper on other pieces.
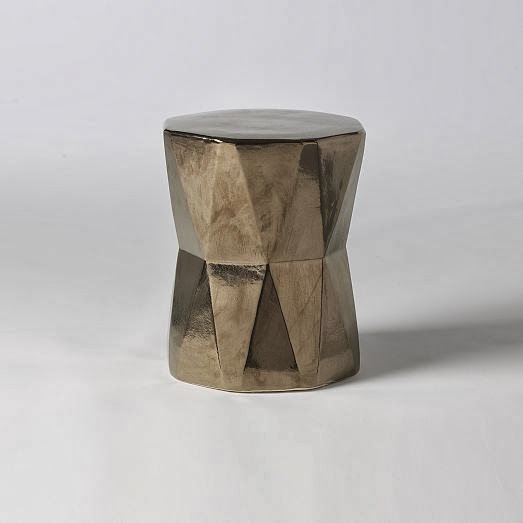
I wanted to put a small side table next to each chair so I sent her these options:
Her husband really liked the West Elm Faceted Ceramic table and she really liked the Sofia table. We decided to do one of each.
Here is a little sneak peak of the finished room.
You'll have to tune in tomorrow to see all the pictures of this finished room!
photo by Samantha Kelly Photography


No comments:
Post a Comment